Introduction
FigX is a CLI tool for managing assets exported from Figma. It's an ideal choice for medium to large projects, as it doesn’t require changes to your project structure and is simple to configure.
-
⚡ Fast: FigX exports and transforms assets from Figma significantly faster than figma-export, and orders of magnitude faster than doing it manually — the only speed limit here is Figma’s REST API rate limit 😅
-
⚖️ Correct: The result of importing assets into your project precisely reflects what’s defined in the FigX configuration — no more, no less.
-
🛡️ Reliable: Importing assets through FigX yields the same result on any machine and any OS. Non-reproducible results can only occur due to changes made by designers in Figma, not because of the developers or the tool.
-
♻️ Caching: Network requests are minimized. Only changed assets are fetched. The cache is portable across machines, making it perfect for CI pipelines and automated workflows.
Installation
Any OS
Build the tool from source:
cargo install --release --locked --path app
MacOS
Homebrew
Easiest way for MacOS is to install from homebrew:
brew tap tonykolomeytsev/figx
brew install figx
Windows
Download the latest .msi installer from the releases page, then run the installer to complete the setup.
Linux
You can install the CLI tool by hand by downloading the latest release from the releases page.
Getting Started
Jump into FigX — a fast, reliable, and cache-friendly tool for managing Figma exports in monorepos.
This guide will walk you through setting up your workspace, and configuring packages to import icons, illustrations, and other assets directly from Figma — with zero manual steps.
Whether you're working in a large codebase or building a design system, FigX helps you automate asset management while keeping your project structure clean and consistent.
Start here to:
- Understand the core concepts (workspace, packages, remotes, profiles)
- Configure your first
.figtree.tomland.fig.tomlfiles. - Import your first assets
Concepts
In this section, we will introduce the fundamental concepts you need to understand in order to work effectively with FigX. These concepts lay the foundation for using the tool and configuring your project.
Workspaces, Packages, Resources
Workspace
Think of it like a workspace in Bazel or Buck2
A workspace is the root directory of a monorepo that contains the marker file .figtree.toml and all its child directories. The .figtree.toml file holds configuration that is shared across all packages within the workspace.

Package
Similar to a package in Bazel or Buck2
Just like in Bazel, a package is any subdirectory within the workspace that contains a .fig.toml file, aka "fig-file". This file defines the package’s local configuration and the list of design resources to import. Intermediate directories between the workspace root and a .fig.toml file are not considered packages.
Example project structure:
foo/
└── bar/
    └── .fig.toml
.figtree.toml
In this example, there is a single package: //foo/bar. The double slash // refers to the root of the workspace.
Resource
A resource is anything you want to pull from Figma
A resource is an image or a set of images you want to import from Figma into your project. This could be an icon, logo, illustration, or any other visual asset. In the .fig.toml file, you define which resources to download and how—for example, specifying the format (like PNG, SVG, etc.).
Remotes
Remote
Similar to a remote in Git
In the context of FigX, a remote refers to a specific file or frame in Figma from which assets are exported. Remotes tell FigX where to fetch the specified resources from.
You can define as many remotes as you need. Different remotes can point to entirely different Figma files, or to different containers, frames, or nodes within the same file.
At least one remote must be marked as default = true—this tells FigX which source to use if no remote is explicitly specified for a resource.
Example configuration in .figtree.toml (workspace root):
[remotes.icons]
default = true
file_key = "LlHCBPLR7yasnxwfsnCapl"
container_node_ids = ["8188-258268", "8188-258269"]
# access_token = ...

[remotes.illustrations]
file_key = "aBcD1234EfGhIjKlMnOpQrSt"
container_node_ids = ["9900-112233"]
# access_token = ...
Access Token Configuration
The access_token field can be configured in multiple ways depending on your environment:
Option 1: Environment Variable
access_token.env = "FIGMA_PERSONAL_TOKEN"
The token will be read from the specified environment variable.
Option 2: Secure Keychain Storage (macOS and Windows only)
access_token.keychain = true
FigX will retrieve the token from the system's secure credential storage. This method is recommended for local development. To add a token to the keychain, run the command:
figx auth
This will launch a web interface to guide you through authentication.
Option 3: Priority Lookup
You can specify a list of token sources in priority order. For example:
access_token = [
  { env = "FIGMA_PERSONAL_TOKEN" },
  { keychain = true },
]
In this case, FigX will first try to read the token from the environment variable. If not found, it will fall back to the secure keychain.
This setup is ideal for combining CI environments (which typically use environment variables) with secure storage on local machines.
Profiles
Profile
A profile is like an export preset in Photoshop
A profile is a predefined way of handling and saving images downloaded from Figma. It specifies how an image should be saved — its format (e.g., PNG, SVG, WEBP), quality, scale, and destination folder.
You can think of a profile as a "recipe" or "template" for processing images.
FigX comes with built-in profiles for importing PNG, SVG, WEBP, and many other types of assets. These profiles can be customized in the .figtree.toml file. You can define your own custom profiles based on these built-in ones, allowing you to extend or tweak their behavior without starting from scratch.
Example configuration for different profiles:
[profiles.webp]
# The scale at which the image will be exported
scale = 2.0
# The target quality of the image when converting to WEBP (range: 0 to 100)
quality = 85
# The directory where the downloaded WEBP images will be saved
output_dir = "res/img"

[profiles.android-drawable-xml]
# The scale at which the image will be exported
scale = 1.0
# Android project res dir
android_res_dir = "src/main/res"
Custom Profiles:
You can modify these built-in profiles to suit your needs, or you can inherit from them to create custom profiles that retain all settings of the original profile and add your custom adjustments.
For example, you could create a custom profile that scales images differently and outputs them to a new directory, inheriting from the default png profile:
[profiles.illustrations]
extends = "png"
scale = 2.0
output_dir = "res/illustrations"
This would use the settings from profile png, but with a custom scale and output directory.
Fig-files
Fig-file (.fig.toml)
Package root marker and resources list
A fig-file (.fig.toml) is a configuration file used within a FigX package to declare which design resources should be imported from Figma, and how they should be processed. Each fig-file is specific to a package and typically lives inside a subdirectory of the workspace.
This file defines which resources (e.g., icons, logos, illustrations) should be downloaded, what format they should be exported in, and allows fine-grained control over how each asset is handled.
Profile-Based Sections
Resources are grouped by format, using TOML tables like [png], [webp], or [android-drawable-xml]. Each section tells FigX which assets to export in that specific profile.
For example:
[png]
ic_nemo = "XEM"
This means: The resource ic_nemo will use the png profile, pulled from the Figma node named "XEM" and then saved with name ic_nemo.png, and using the default profile settings (scale/output_dir/etc.).

What is a "fig-file"?
- A fig-file maps local resource names (like
ic_tron) to Figma node names (like "TRX") - It also assigns a processing profile to each group of resources
- This gives you fine control over how assets are imported on a per-package basis
Per-Resource Profile Overrides
You can override profile properties for individual resources directly in the .fig.toml file. These overrides can include any fields supported by the profile.
Example:
[svg]
ic_iost = { name = "IOST", scale = 4.0, output_dir = "legacy" }
Here, the ic_iost resource:
- Uses the
svgprofile, image will saved to{package_dir}/legacy/ic_iost.svg - Pulls the image from the Figma node named "IOST"
- Is exported at 4.0x scale, overriding the default scale in the profile
Why You Can’t Override Profiles at the Package Level
FigX intentionally does not allow overriding profiles for an entire package in the .fig.toml file. This is by design.
Allowing global profile overrides at the package level would introduce hidden behavior and make it much harder to understand how resources are actually processed. It becomes difficult to trace what’s coming from where, especially in larger monorepos.
Experience has shown that such flexibility often leads to chaos—confusing overrides, inconsistent exports, and "spaghetti configuration". Projects start to drift apart in terms of conventions and structure.
This restriction prevents misuse—particularly by those with an "OOP brain" tendency to over-abstract and over-engineer configuration through excessive inheritance. Instead of building fragile, implicit hierarchies, FigX favors explicit and local control: you override what you need, where you need it — resource by resource. This keeps things, predictable, easy to trace, less error-prone.
In short: no magic behind the scenes, even in FigX.
Labels
Label
A label in FigX is the same concept as a label in Bazel.
A label in FigX is a canonical identifier for a resource or package within a workspace. It follows the format:
//path/to/package:resource-name
where:
//refers to the root of the FigX workspacepath/to/packageis the relative path to the package containing the resourceresource-nameis the name of the resource defined in.fig.toml.
Labels are used to reference resources unambiguously across different packages.
Label matching
Each resource defined in a fig-file (.fig.toml) has a label, which is made up of the package path and the resource name.
Example
Let’s say you have two fig-files:
Root-level .fig.toml:
[svg]
ic_crab = "Icons/Crab"
Inside foo/bar/.fig.toml:
[svg]
ic_star = "Icons/Star"
Now your workspace contains two resources with the following labels:
//:ic_crab— located at the root of the workspace//foo/bar:ic_star— located in thefoo/barpackage
Label Patterns
Most FigX commands accept label patterns that define which resources to operate on. This pattern matching works similarly to how it's done in Bazel or Buck2.
For example:
-
figx import //...
→ Matches all resources in the workspace (recursive wildcard) -
figx import //:all
→ Matches only resources in the root package (non-recursive) -
figx import //foo/bar:ic_star
→ Matches a single, specific resource -
figx import //foo/...
→ Matches all resources under foo/, including nested packages
Why it’s like Bazel
This label syntax is inspired by the build system Bazel, and follows a similar convention. You can learn more about label patterns in Bazel’s official docs here:
Setup
Ready to make FigX part of your workflow?
This section will guide you through setting up FigX in your project — from the simplest possible example to more advanced workspace layouts.
You'll start by configuring the basics: adding your Figma access token, and creating your first .figtree.toml file. From there, we’ll move step-by-step through progressively more powerful setups, including multi-package monorepos, custom profiles, and multiple remotes.
Whether you're prototyping or building a full design pipeline, these examples will help you get FigX running smoothly in your environment.
Let’s get started!
Minimal Example
Let’s start with a quick and simple setup using a public Figma file that contains a set of icons.
We’ll use this community file as our source: 👉 Coolicons — Free Iconset
Preparation
Step 1: Get the file_key
When you open that link in your browser, you’ll see the Figma file URL. The file_key is the part right after /design/:
https://www.figma.com/design/MhjeA23R15tAR3PO2JamCv/coolicons-...
                             ^^^^^^^^^^^^^^^^^^^^^^ <- This is the file_key
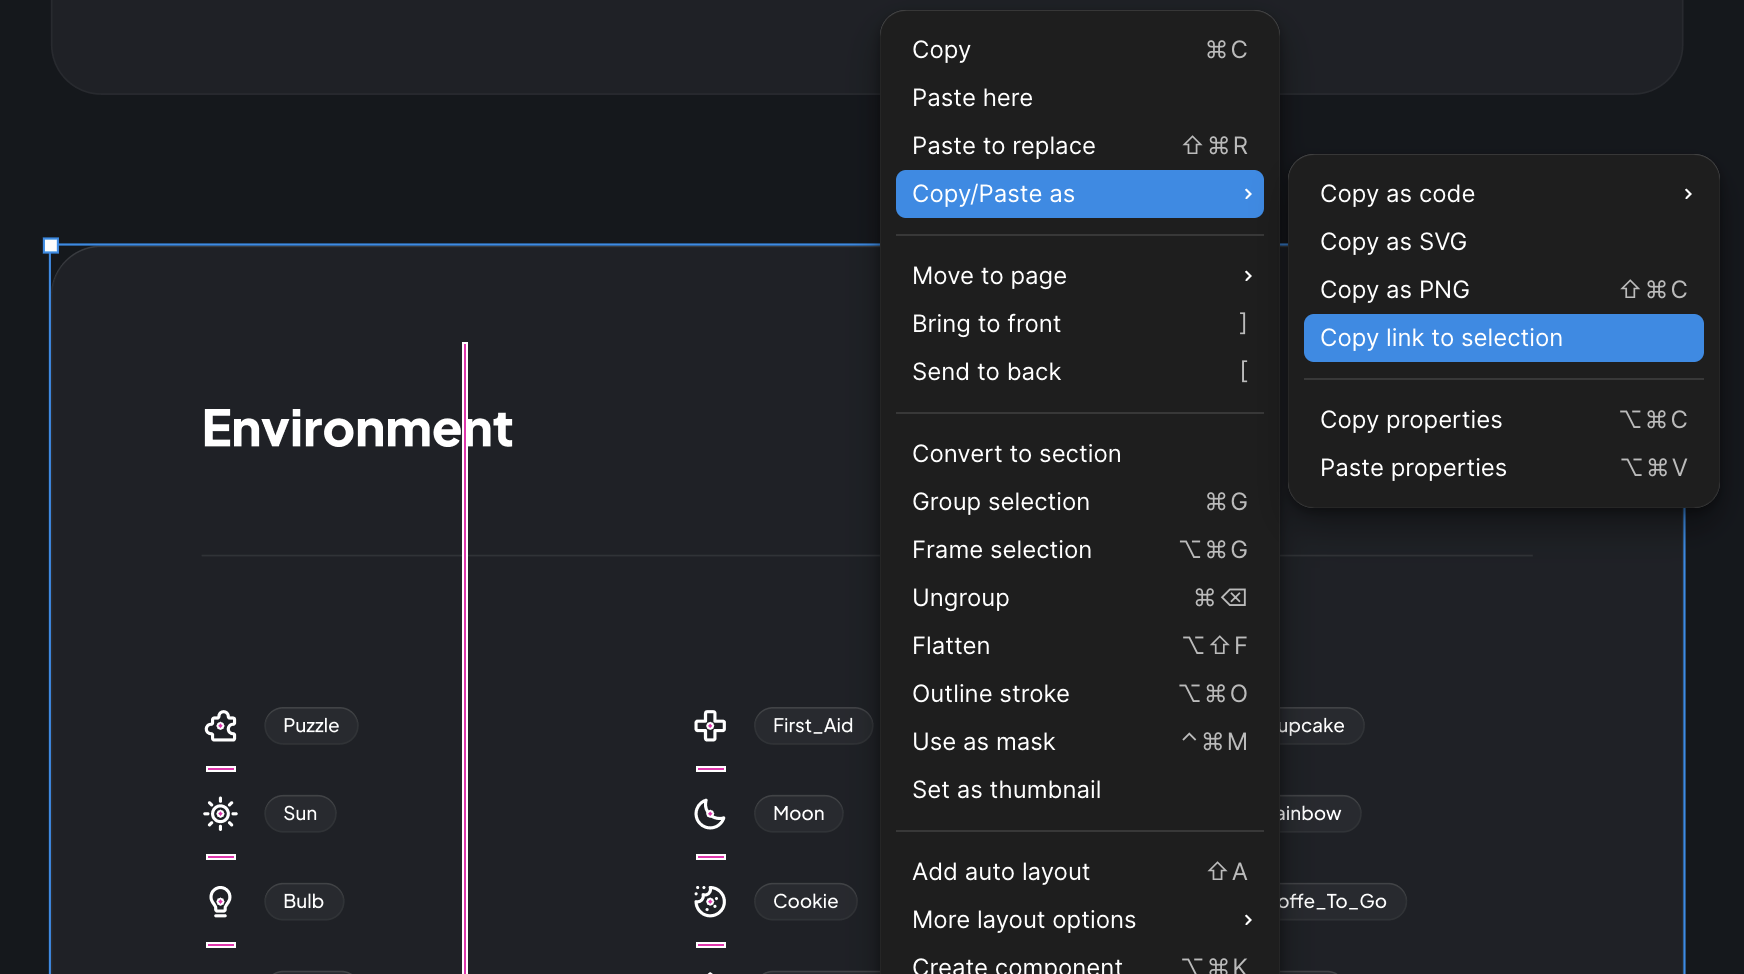
Step 2: Get a container node id
FigX needs to know where exactly to look for assets in your Figma file — that's where container node IDs come in.
To get one, simply right-click the frame or component group you're interested in, and copy its "Copy link" (selection URL).
For example, if you copy the link for a container holding a set of icons:
The URL will look something like this:
https://www.figma.com/design/.../...?node-id=30788-66292
                                             ^^^^^^^^^^^ <- node id of our container
You can include one or more of these IDs in your .figtree.toml config to tell FigX where to fetch assets from.
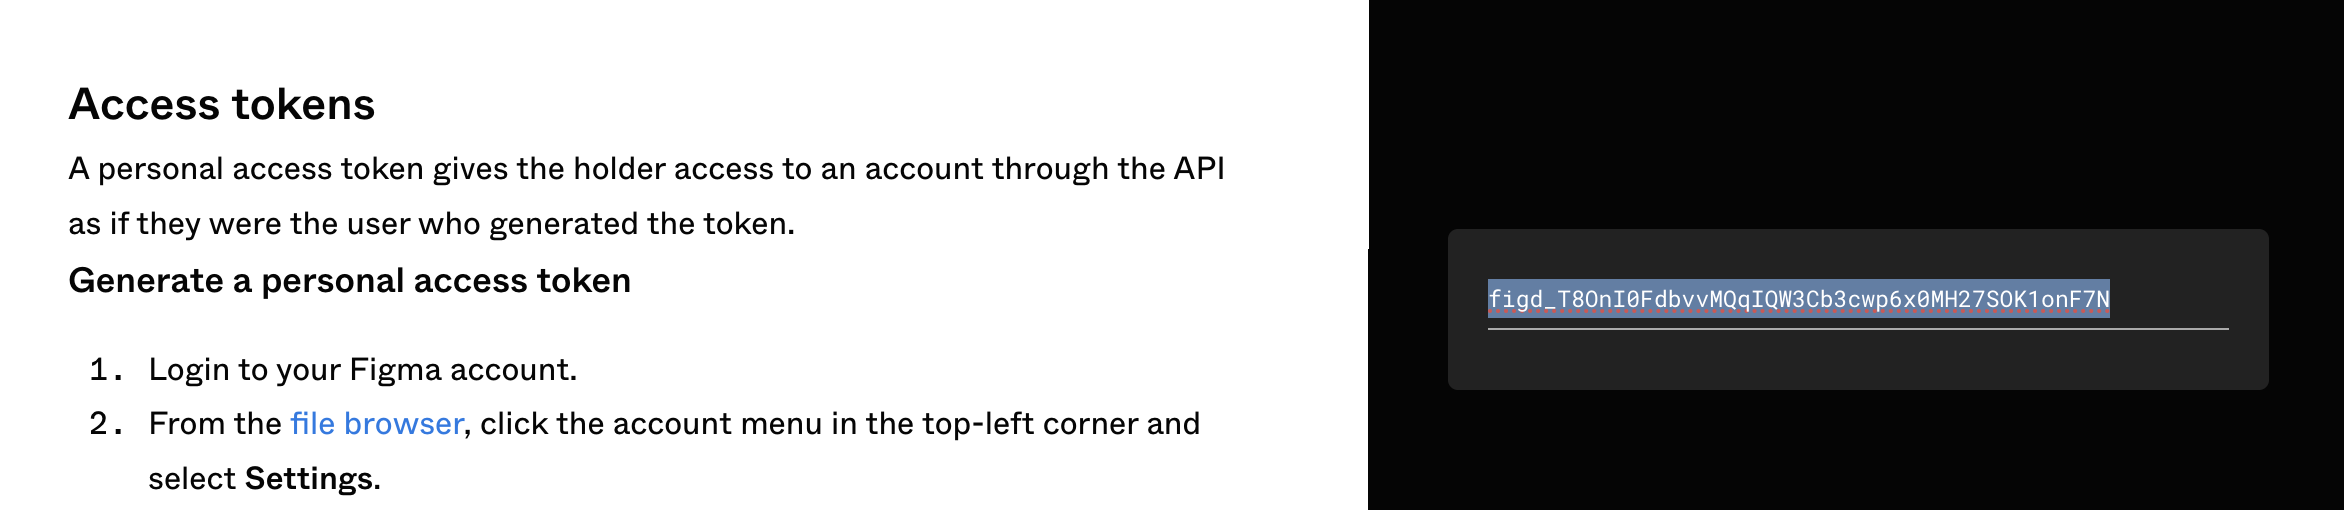
Step 3: Get a Figma Access Token
To let FigX communicate with Figma’s REST API, you need an access token.
For a quick temporary token (valid for a few hours), go here: 👉 https://www.figma.com/developers/api#access-tokens
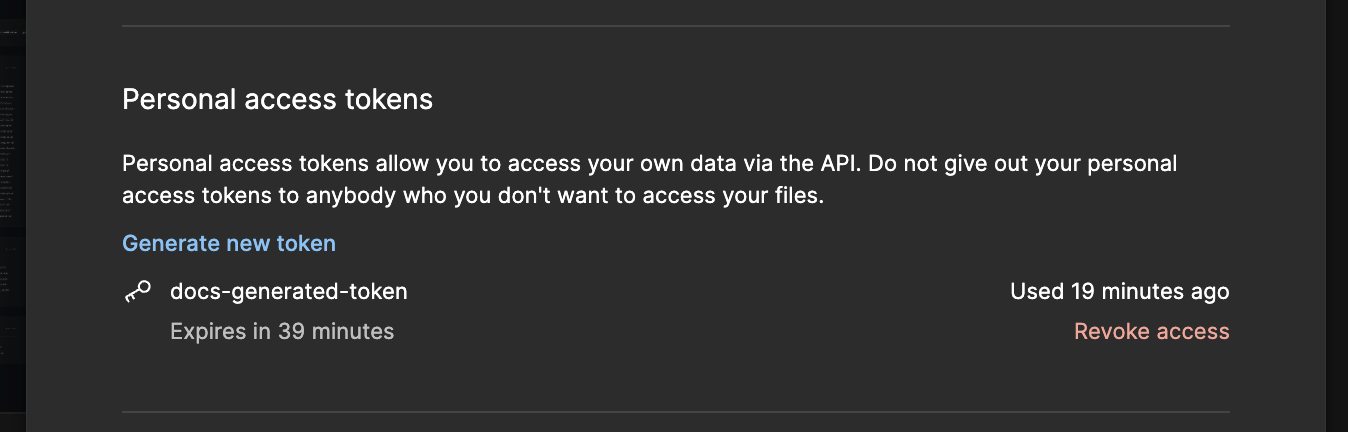
For a permanent personal token, you can generate one in your Figma account settings:
Setup
Step 1: Create a Workspace
Now let’s set up the project.
In the root of your repository, create a .figtree.toml file:
[remotes.figma]
file_key = "MhjeA23R15tAR3PO2JamCv"      # From the URL
container_node_ids = ["30788-66292"]     # The container node ID where icons live
access_token = "..."                     # Your Figma access token
That’s all you need for the global config.
Step 2: Add a Fig-file (Package Config)
Next, create a .fig.toml file in the same directory (we’ll treat the root as a package for now):
[svg]
puzzle = "Environment / Puzzle"
This tells FigX to pull a vector image named "Environment / Puzzle" from Figma, and save it locally as puzzle.svg using the svg profile.
![]()
Step 3: Run the Import
With everything set up, run the CLI:
figx import //...
✅ Done!
You’ll see a new file puzzle.svg in your current directory, exported straight from Figma:

How-to Guides
This section contains highly practical content — ready-to-use recipes, pro tips, and examples of how to make the most out of the figx utility.
Recipes
This section provides a collection of recipes for almost every use case. It includes ready-made configuration examples for importing assets from Figma into projects of varying structure and complexity. While basic import scenarios can be configured manually with little effort, setting up a multi-stage pipeline tailored to a mature project can be far more challenging. Feel free to use these examples as a starting point and adapt them to your needs.
Android – Import WEBP assets into drawable directories with dark theme support
This recipe shows how to configure FigX to export illustrations from Figma as WEBP images into Android drawable-* directories, including dark theme variants based on a naming convention.
Project structure
.
├── app/
│   ├── src/main/
│   │   ├── kotlin/
│   │   └── res/
│   │       └── drawable-*/
│   ├── .fig.toml
│   └── build.gradle
├── .figtree.toml
├── settings.gradle
└── build.gradle
Workspace config
# .figtree.toml
[remotes.illustrations]
file_key = "..."
container_node_ids = ["..."]

[illustrations]
extends = "android-webp"
remote = "illustrations"
# Export only the required density scales
scales = ["hdpi", "xhdpi", "xxhdpi", "xxxhdpi"]
# Dark theme support configuration
# Defines the naming pattern for dark theme variants
# {base} will be replaced with the base asset name
# Leave unset to disable dark theme support
# For example, if you have an asset named "ill-welcome" in Figma,
# figx will also look for "ill-welcome-dark" when night mode is enabled
night = "{base}-dark"
# Losless quality by default (recommended)
quality = 100
FigX automatically looks for Figma nodes like illustrations/start-dark when the night naming pattern is defined.
Each module in your workspace can define its own
.fig.tomlto select specific assets and optionally override settings from the workspace-level.figtree.tomlprofile.
Fig-file app/.fig.toml config
# .fig.toml
[illustrations]
# <name of resource in project> = <name of figma node>
ill_start = "illustrations/start"
# you can override any field of parent profile "illustrations"
ill_finish = { name = "illustrations/finish", quality = 75 }
You can override individual fields from the parent profile per asset using inline tables. In the example above, the export quality for ill_finish is lowered to 75.
Run
figx import //...
Note: The
//...pattern recursively imports all modules with.fig.tomlconfigs found in the workspace.
Result
.
├── app/
│   ├── src/main/
│   │   ├── kotlin/
│   │   └── res/
│   │       ├── drawable-hdpi/
│   │       │   ├── ill_start.webp
│   │       │   └── ill_finish.webp
│   │       ├── drawable-night-hdpi/
│   │       │   ├── ill_start.webp
│   │       │   └── ill_finish.webp
│   │       ├── drawable-xhdpi/
│   │       │   ├── ill_start.webp
│   │       │   └── ill_finish.webp
│   │       ├── drawable-night-xhdpi/
│   │       │   ├── ill_start.webp
│   │       │   └── ill_finish.webp
│   │       ├── drawable-xxhdpi/
│   │       │   ├── ill_start.webp
│   │       │   └── ill_finish.webp
│   │       ├── drawable-night-xxhdpi/
│   │       │   ├── ill_start.webp
│   │       │   └── ill_finish.webp
│   │       ├── drawable-xxxhdpi/
│   │       │   ├── ill_start.webp
│   │       │   └── ill_finish.webp
│   │       └── drawable-night-xxxhdpi/
│   │           ├── ill_start.webp
│   │           └── ill_finish.webp
│   ├── .fig.toml
│   └── build.gradle
├── .figtree.toml
├── settings.gradle
└── build.gradle
Android - Import WEBP assets into multiple feature modules
This guide demonstrates how to configure figx to export illustrations from Figma as WEBP images into Android drawable-* directories, including dark theme variants using a naming convention. Unlike basic implementations, this solution supports multi-module applications where assets need to be distributed across different feature modules.
Project structure
Two feature modules — feature/settings and feature/update:
.
├── app/
│   └── build.gradle
├── feature/
│   ├── settings/
│   │   ├── src/main/res/
│   │   ├── .fig.toml
│   │   └── build.gradle
│   └── update/
│       ├── src/main/res/
│       ├── .fig.toml
│       └── build.gradle
├── .figtree.toml
├── settings.gradle
└── build.gradle
Workspace config
# .figtree.toml
[remotes.illustrations]
file_key = "..."
container_node_ids = ["..."]

[illustrations]
extends = "android-webp"
remote = "illustrations"
# Export only the required density scales
scales = ["xhdpi"]
# Dark theme support configuration
# Defines the naming pattern for dark theme variants
# {base} will be replaced with the base asset name
# Leave unset to disable dark theme support
# For example, if you have an asset named "Ill / Welcome" in Figma,
# figx will also look for "Ill / Welcome / Dark" when night mode is enabled
night = "{base} / Dark"
# Losless quality by default (recommended)
quality = 100
FigX automatically looks for Figma nodes like Ills / User / Dark when the night naming pattern is defined.
Each module in your workspace can define its own
.fig.tomlto select specific assets and optionally override settings from the workspace-level.figtree.tomlprofile.
Fig-file configurations
# feature/settings/.fig.toml
[illustrations]
# <resource name in project> = <Figma node name>
ill_user = "Ills / User"
# feature/update/.fig.toml
[illustrations]
# Override any field from parent profile
ill_outdated = { name = "Ills / Outdated", quality = 75 }
You can override individual fields from the parent profile per asset using inline tables. In the example above, the export quality for ill_outdated is lowered to 75.
Run
figx import //...
Note: The
//...pattern recursively imports all modules with.fig.tomlconfigs found in the workspace.
Result
.
├── app/
│   └── build.gradle
├── feature/
│   ├── settings/
│   │   ├── src/main/res/
│   │   │   ├── drawable-xhdpi/
│   │   │   │   └── ill_user.webp
│   │   │   └── drawable-night-xhdpi/
│   │   │       └── ill_user.webp
│   │   ├── .fig.toml
│   │   └── build.gradle
│   └── update/
│       ├── src/main/res/
│       │   ├── drawable-xhdpi/
│       │   │   └── ill_outdated.webp
│       │   └── drawable-night-xhdpi/
│       │       └── ill_outdated.webp
│       ├── .fig.toml
│       └── build.gradle
├── .figtree.toml
├── settings.gradle
└── build.gradle
Android Compose – Import monochrome icons as ImageVector
This recipe demonstrates how to import vector icons directly as ImageVector resources in a Jetpack Compose project, with auto-generated Kotlin files containing the icon implementations.
Project structure
.
├── app/
│   ├── src/main/kotlin/
│   │   └── com.example.myapp.ui.icons/
│   │       └── .fig.toml
│   └── build.gradle
├── .figtree.toml
├── settings.gradle
└── build.gradle
Important: The
.fig.tomlis placed in the target package directory where icons will be generated. This ensures:
- Automatic package detection for generated
.ktfiles- Seamless refactoring (paths remain valid if package changes)
- Clean separation of generated code
Workspace config
# .figtree.toml
[remotes.icons]
file_key = "..."
container_node_ids = ["..."]

[icons]
extends = "compose"
remote = "icons"
color_mappings = [
    # Change all colors to black
    { from = "*", to = "Color.Black" },
]
Each module in your workspace can define its own
.fig.tomlto select specific assets and optionally override settings from the workspace-level.figtree.tomlprofile.
Fig-file configuration
# app/src/main/kotlin/com/example/myapp/ui/icons/.fig.toml
[icons]
Puzzle = "Icons / Puzzle"
Star = "Icons / Star"
Run
figx import //...
Note: The
//...pattern recursively imports all modules with.fig.tomlconfigs found in the workspace.
Result
.
├── app/
│   ├── src/main/kotlin/
│   │   └── com.example.myapp.ui.icons/
│   │       ├── .fig.toml
│   │       ├── Puzzle.kt  # Generated ImageVector
│   │       └── Star.kt    # Generated ImageVector
│   └── build.gradle
├── .figtree.toml
├── settings.gradle
└── build.gradle
Android Compose – Import multi-variant monochrome icons as ImageVector
This guide demonstrates how to import multiple variants of vector icons (different sizes/states) as ImageVector resources in Jetpack Compose. Unlike basic icon import, this solution handles:
- Multiple size variants (16dp, 24dp, 32dp)
- Custom variant naming rules
Project structure
.
├── app/
│   ├── src/main/kotlin/
│   │   └── com.example.myapp.ui.icons/
│   │       └── .fig.toml
│   └── build.gradle
├── .figtree.toml
├── settings.gradle
└── build.gradle
Important: The
.fig.tomlis placed in the target package directory where icons will be generated. This ensures:
- Automatic package detection for generated
.ktfiles- Seamless refactoring (paths remain valid if package changes)
- Clean separation of generated code
Workspace config
# .figtree.toml
[remotes.icons]
file_key = "..."
container_node_ids = ["..."]

[icons]
extends = "compose"
remote = "icons"
color_mappings = [
    # Change all colors to black
    { from = "*", to = "Color.Black" },
]
# {base} = icon base name (e.g. "Puzzle")
# {variant} = variant identifier (e.g. "24")
variant_naming.local_name = "{base}{variant}" # Output: Puzzle24.kt
variant_naming.figma_name = "{base} / {variant}" # Figma: "Puzzle / 24"
# Supported variants (must exist in Figma)
variants = ["32", "24", "16"]
Each module in your workspace can define its own
.fig.tomlto select specific assets and optionally override settings from the workspace-level.figtree.tomlprofile.
Fig-file configuration
# app/src/main/kotlin/com/example/myapp/ui/icons/.fig.toml
[icons]
# Case 1: Import all configured variants (32/24/16)
# In figma: "Icons / Puzzle / 32", "Icons / Puzzle / 24", "Icons / Puzzle / 16"
Puzzle = "Icons / Puzzle"
# Case 2: Import only specific variant
Star = { name = "Icons / Star", variants = ["16"] }
Run
figx import //...
Note: The
//...pattern recursively imports all modules with.fig.tomlconfigs found in the workspace.
Result
.
├── app/
│   ├── src/main/kotlin/
│   │   └── com.example.myapp.ui.icons/
│   │       ├── .fig.toml
│   │       ├── Puzzle32.kt   # Generated ImageVector
│   │       ├── Puzzle24.kt   # Generated ImageVector
│   │       ├── Puzzle316.kt  # Generated ImageVector
│   │       └── Star16.kt     # Generated ImageVector
│   └── build.gradle
├── .figtree.toml
├── settings.gradle
└── build.gradle
Running on CI
When running on CI, consider the following specifics of how figx operates:
Progress bar is disabled
CI environments typically do not support animated progress bars in stdout/stderr. figx will automatically disable it. To monitor the import process, use the -v flag to enable basic logging showing which resources are being processed.
Note:
figxwill automatically enable basic logging if it detects the environment variableCI.figxwill automatically enable debug logging if it detects one of the following environment variable:DEBUG,ACTIONS_RUNNER_DEBUG, orACTIONS_STEP_DEBUG.
Example:
figx -v import //...
Limit concurrency
CI runners often have a large number of logical cores. By default, figx uses a thread pool equal to the number of logical CPUs. On machines with 64+ threads, this may result in a flood of 429 and 500 errors from Figma REST API. It is strongly recommended to limit concurrency using the -j flag.
Example:
figx -j8 import //... # only 8 threads will be spawned
(Experimental) Metrics reporting
During execution, figx collects metrics on the number of resources scheduled, downloaded, and served from cache.
For now, metrics are available for
fetchandimportcommands only.
Output is saved to .figx-out/caches/metrics.prom.
Caching Between Runs
To improve performance and minimize network usage, configure caching for the .figx-out/caches directory in your CI environment. This directory stores indexed Figma files and downloaded resources. On subsequent runs, figx can re-download only the resources that have changed in the Figma file, rather than fetching everything from scratch. This can drastically reduce execution time for repeated CI runs.
Profiles Reference
This document describes all built-in import profiles available in FigX. Profiles can be configured in the root .figtree.toml file and extended to create custom import configurations.
Profile Types
- Image Profiles
- png: Basic PNG asset import
- webp: WebP format conversion
- android-webp: Android-optimized WebP with density and theme support
- Vector Profiles
- svg: Raw SVG import
- compose: Jetpack Compose ImageVector conversion
- Document Profiles
- pdf: Document export
Configuration Structure
All profiles share common configuration properties:
[profiles.{profile_name}]
# Reference to remote configuration
remote = "default"
Extending Profiles
Create custom profiles by inheriting from existing ones:
[profiles.custom-webp]
extends = "webp"  # Inherit all base webp settings
# Override specific properties
quality = 90
output_dir = "src/webp_assets"
Best Practices
- Naming Conventions:
- Use lowercase with hyphens (profile-name)
- Be descriptive (android-icon-webp)
- Organization:
- Group related profiles in sections
- Use comments for documentation
- Do not abuse inheritance!
PNG Profile
Purpose
The profile is designed for importing PNG assets from Figma.
The asset import process consists of the following stages:
- Fetch Figma remote: REST API reference
- Locate the node ID by the specified name
- Request PNG export from Figma using the node ID: REST API reference
- Download the exported PNG file
Complete Configuration in .figtree.toml
[profiles.png]
# ID from the [remotes] section.
# Uses the default remote if unspecified, but can reference any configured remote
remote = "some_remote_id"
# Export scale for the image from Figma (default: 1.0)
scale = 1.0
# Target directory for downloaded assets.
# Defaults to empty (root package directory where .fig.toml resides)
output_dir = "some_dir"
# Specifies which variants to use. Only the listed keys will be processed.
# Can be overridden in .fig.toml for each resource
variants.use = ["L", "M", "S"]
# Available variants
# output_name - filename for the exported file
# figma_name - node name in Figma to look for
variants.L = { output_name = "{base}L", figma_name = "{base}_24" }
variants.M = { output_name = "{base}M", figma_name = "{base}_20" }
variants.S = { output_name = "{base}S", figma_name = "{base}_16" }
variants.XS = { output_name = "{base}XS", figma_name = "{base}_12" }
# If true, the legacy resource loading method will be used.
# The new approach downloads the SVG source and renders the raster image locally.
# In most cases, this significantly speeds up the import process.
# This may not suit all use cases, so the feature can be disabled.
legacy_loader = false
SVG Profile
Purpose
The profile is designed for importing SVG assets from Figma.
The asset import process consists of the following stages:
- Fetch Figma remote: REST API reference
- Locate the node ID by the specified name
- Request SVG export from Figma using the node ID: REST API reference
- Download the exported SVG file
Complete Configuration in .figtree.toml
[profiles.svg]
# ID from the [remotes] section.
# Uses the default remote if unspecified, but can reference any configured remote
remote = "some_remote_id"
# Target directory for downloaded assets.
# Defaults to empty (root package directory where .fig.toml resides)
output_dir = "some_dir"
# Specifies which variants to use. Only the listed keys will be processed.
# Can be overridden in .fig.toml for each resource
variants.use = ["L", "M", "S"]
# Available variants
# output_name - filename for the exported file
# figma_name - node name in Figma to look for
variants.L = { output_name = "{base}L", figma_name = "{base}_24" }
variants.M = { output_name = "{base}M", figma_name = "{base}_20" }
variants.S = { output_name = "{base}S", figma_name = "{base}_16" }
variants.XS = { output_name = "{base}XS", figma_name = "{base}_12" }
PDF Profile
Purpose
The profile is designed for importing PDF assets from Figma.
The asset import process consists of the following stages:
- Fetch Figma remote: REST API reference
- Locate the node ID by the specified name
- Request PDF export from Figma using the node ID: REST API reference
- Download the exported PDF file
Complete Configuration in .figtree.toml
[profiles.pdf]
# ID from the [remotes] section.
# Uses the default remote if unspecified, but can reference any configured remote
remote = "some_remote_id"
# Target directory for downloaded assets.
# Defaults to empty (root package directory where .fig.toml resides)
output_dir = "some_dir"
# Specifies which variants to use. Only the listed keys will be processed.
# Can be overridden in .fig.toml for each resource
variants.use = ["L", "M", "S"]
# Available variants
# output_name - filename for the exported file
# figma_name - node name in Figma to look for
variants.L = { output_name = "{base}L", figma_name = "{base}_24" }
variants.M = { output_name = "{base}M", figma_name = "{base}_20" }
variants.S = { output_name = "{base}S", figma_name = "{base}_16" }
variants.XS = { output_name = "{base}XS", figma_name = "{base}_12" }
WEBP profile
Purpose
The profile is designed for importing WEBP assets from Figma.
The asset import process consists of the following stages:
- Fetch Figma remote: REST API reference
- Locate the node ID by the specified name
- Request PDF export from Figma using the node ID: REST API reference
- Download the exported PNG file
- Convert the downloaded PNG to WEBP format (using
libwebp)
Complete Configuration in .figtree.toml
[profiles.webp]
# ID from the [remotes] section.
# Uses the default remote if unspecified, but can reference any configured remote
remote = "some_remote_id"
# Export scale for the image from Figma (default: 1.0)
scale = 1.0
# Target directory for downloaded assets.
# Defaults to empty (root package directory where .fig.toml resides)
output_dir = "some_dir"
# Output quality for WEBP conversion (0-100)
# Defaults to 100 (lossless) - recommended value
quality = 100
# Specifies which variants to use. Only the listed keys will be processed.
# Can be overridden in .fig.toml for each resource
variants.use = ["1x", "2x", "3x"]
# Available variants
# output_name - filename for the exported file
# figma_name - node name in Figma to look for
variants.1x = { output_name = "{base}", figma_name = "{base}", scale = 1.0 }
variants.2x = { output_name = "{base}@2x", figma_name = "{base}", scale = 2.0 }
variants.3x = { output_name = "{base}@3x", figma_name = "{base}", scale = 3.0 }
# If true, the legacy resource loading method will be used.
# The new approach downloads the SVG source and renders the raster image locally.
# In most cases, this significantly speeds up the import process.
# This may not suit all use cases, so the feature can be disabled.
legacy_loader = false
Compose profile
Purpose
The profile is designed for importing vector assets from Figma and converting them directly into Compose's ImageVector format.
The asset import process consists of the following stages:
- Fetch Figma remote: REST API reference
- Locate the node ID by the specified name
- Request SVG export from Figma using the node ID: REST API reference
- Download the exported SVG file
- Simplify the SVG to retain only groups and paths (using usvg library)
- Convert the simplified SVG to ImageVector format
Complete Configuration in .figtree.toml
[profiles.compose]
# ID from the [remotes] section.
# Uses the default remote if unspecified, but can reference any configured remote
remote = "some_remote_id"
# Path to Kotlin source directory
# Defaults to empty (files are placed in package root alongside .fig.toml)
src_dir = "src/res/main"
# Target Kotlin package for generated *.kt files
# When unspecified, FigX attempts to auto-detect the package
# Explicit empty string will omit package declaration
package = "com.example.mypackage"
# When true, all generated Kotlin fields will have explicit visibility modifiers
# Default: false
kotlin_explicit_api = false
# Marks the get() accessor of the property with the @Composable annotation.
composable_get = false
# Fully qualified class/object name to extend with generated ImageVector
# When specified:
# - Adds required import
# - Modifies declaration to: public val ${extension_target}.{icon_name}: ImageVector = ...
extension_target = "com.example.mypackage.AppIcons"
# Lint suppressions to add via @file:Suppress(...)
# Default: empty list
file_suppress_lint = ["LongMethod", "MagicNumbers"]
# Color transformations to apply during generation
# Default: no transformations
color_mappings = [
    # Example: replace all colors with Color.Black
    { from = "*", to = "Color.Black" },
    # Example: replace all red colors (#ff0000) with Color.Red
    { from = "ff0000", to = "Color.Red" },

    # IMPORTANT:
    # - 'from' must be a HEX color code WITHOUT alpha channel
    #   (alpha is lost during SVG simplification and handled via group opacity)
    # - 'to' must contain exact code to be inserted
]
# Custom preview generation template
# Overrides default FigX preview implementation
preview.code = """
@Preview
@Composable
private fun Preview() {
    Icon(imageVector = {name}, contentDescription = null)
}
"""
# Additional imports to include with preview
preview.imports = [
    "androidx.compose.ui.tooling.preview.Preview",
    "androidx.compose.runtime.Composable",
]
# Specifies which variants to use. Only the listed keys will be processed.
# Can be overridden in .fig.toml for each resource
variants.use = ["L", "M", "S"]
# Available variants
# output_name - filename for the exported file
# figma_name - node name in Figma to look for
variants.L = { output_name = "{base}L", figma_name = "{base}_24" }
variants.M = { output_name = "{base}M", figma_name = "{base}_20" }
variants.S = { output_name = "{base}S", figma_name = "{base}_16" }
variants.XS = { output_name = "{base}XS", figma_name = "{base}_12" }
Android-Webp profile
Purpose
The profile is designed to import WEBP resources as an android drawable resources. Different densities (ldpi, mdpi, hdpi, xhdpi, etc) and light/dark options (night) are supported.
Default loading process
The asset import process consists of the following stages:
- Fetch Figma remote: REST API reference
- Locate the node ID by the specified name
- Request SVG export from Figma using the node ID: REST API reference
- Includes dark theme variants when configured (night)
- Download SVG assets
- Render SVG images into PNG for all requested densities
- Convert rendered PNGs to WEBP format (using
libwebp) - Organize outputs in standard Android resource structure:
drawable-{density}/drawable-night-{density}
Legacy loading process (legacy_loader = true)
The asset import process consists of the following stages:
- Fetch Figma remote: REST API reference
- Locate the node ID by the specified name
- Request PNG export from Figma using the node ID: REST API reference
- Batch request PNG exports for all densities
- Includes dark theme variants when configured (night)
- Download all PNG assets
- Convert to WEBP format (using
libwebp) - Organize outputs in standard Android resource structure:
drawable-{density}/drawable-night-{density}
Complete Configuration in .figtree.toml
[profiles.android-webp]
# ID from the [remotes] section.
# Uses the default remote if unspecified, but can reference any configured remote
remote = "some_remote_id"
# Root Android resources directory
# (parent of drawable-* folders)
android_res_dir = "src/main/res"
# Output quality for WEBP conversion (0-100)
# Defaults to 100 (lossless) - recommended value
quality = 100
# Density configurations
scales = ["mdpi", "hdpi", "xhdpi", "xxhdpi", "xxxhdpi"]
# Dark theme configuration
# Naming pattern for dark theme variants
# {base} is replaced with base asset name
# Leave unspecified to disable dark theme support
night = "{base} / Dark"
# If true, the legacy resource loading method will be used.
# The new approach downloads the SVG source and renders the raster image locally.
# In most cases, this significantly speeds up the import process.
# This may not suit all use cases, so the feature can be disabled.
legacy_loader = false
Android drawable profile
Purpose
The profile is designed to import vector images resources as an android drawable XML vector resources. Light/dark options (night) are supported.
Default loading process
The asset import process consists of the following stages:
- Fetch Figma remote: REST API reference
- Locate the node ID by the specified name
- Request SVG export from Figma using the node ID: REST API reference
- Includes dark theme variants when configured (night)
- Download SVG assets
- Simplify SVG assets and transform them to Android drawable XML vector resources
- Organize outputs in standard Android resource structure:
drawable/drawable-night/
Complete Configuration in .figtree.toml
[profiles.android-drawable]
# ID from the [remotes] section.
# Uses the default remote if unspecified, but can reference any configured remote
remote = "some_remote_id"
# Root Android resources directory
# (parent of drawable-* folders)
android_res_dir = "src/main/res"
# Dark theme configuration
# Naming pattern for dark theme variants
# {base} is replaced with base asset name
# Leave unspecified to disable dark theme support
night = "{base} / Dark"
Remotes Reference
Remotes in figx function similarly to Git remotes - they define the source locations in Figma where your design assets are stored. A remote configuration specifies:
- Which Figma file to access
- Precisely where in that file to look for assets
- Authentication credentials
Key Concepts:
- Multiple Remotes: You can configure several remotes pointing to different Figma files or different sections within the same file
- Default Remote: One remote must be marked as default for fallback operations
- Targeted Exporting: By specifying node IDs, you optimize performance by only accessing relevant portions of the Figma file
Configuration Syntax
[remotes.{remote_name}]
# Marks the default remote for fallback operations
default = true|false
# Unique Figma file identifier
file_key = "figma_file_identifier"
# Array of specific node IDs to target
container_node_ids = ["node_id_1", "node_id_2"]
# Figma API token (can use ENV vars)
# -- access_token = "your_figma_token"
# default is below:
access_token = { env = "FIGMA_PERSONAL_TOKEN" }